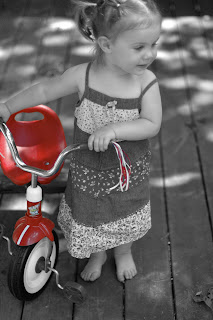
I fell in love with black and white photography in high school. At the time, the only way to create your own pictures was to hide in the dark room until you had mastered your light exposure and your hands smelled like fixer. It was magical. And I was apprehensive of digital photography at first, because the computer would be handling the process instead of me. But this technique made me a convert, because I could never do this in a dark room...
and it's such a nice effect. So nice in fact, that many do it and many have different techniques of doing it. Here's what works for me:
1) Open your picture
2) Create another new adjustment layer, Layer>New Adjustment Layer>Gradient Map. Select the black to white gradient. If the image looks infrared, click the "Reverse" button and it will go back to normal. Click "OK" to apply the gradient map.3) Now zoom in on the area to be colored so that it fills your screen. Select your brush tool, pick a size, set mode to "normal" and opacity to "100%." Set the foreground color to black. Make sure the gradient map layer is selected and begin to paint over the area to be colored. I like to investigate the brush's "more options" and soften the brush as I reach the outside edges.
4) Once I've finished painting the colored area, I usually see some color beyond the outside edges. Tidy it back up by setting the foreground color to white, then paint the color away once more.
5) Flatten your image, save as a .jpg, and...
6) Sigh a deep sigh of relief that the little boys noticing your daughter's eyes are still more interested in their trucks than her.


No comments:
Post a Comment
Note: Only a member of this blog may post a comment.